top of page
Kiley Secrest
Preservationist,
Artist, & Librarian

Black Holocaust Memorial

Black Holocaust (Secrest,18)
It was a grey and overcast day when our class ventured out to visit the Black Holocaust Memorial on Anderson Lane, located on the edge of Savannah's Victorian District. This monument is one of the best examples of "outsider art" imaginable. In the two years I have lived in Savannah I have probably driven by this monument hundreds of times. I've only noticed it once but admittedly never gave it more than a glance. Now I wish that I had investigated it much sooner.
The artist is a Savannah local named James Kimble. Kimble is a kind and soft-spoken man. You have to lean in closely when he speaks because you will undoubtedly miss something important if you aren't listening closely. He begins by talking about his labor of love. Of course our first question is how long it has taken him to construct his enormous monument. Kimble has been working on "Black Holocaust" since 2002! His work is a counter monument to the well-known and controversial slave monument located on River Street on the Savannah riverfront.
Kimble's main problem with the monument is how the slaves are depicted. It is an African-American family of four dressed in modern attire with loose chains around their feet being the only nod toward slavery. Kimble felt that choosing a white sculptor to create the monument was a poor choice because it is not part of their heritage. The artist could never empathize with that heritage and that pain. It would be like him trying to sculpt George Washington, he could attempt to but it would never turn out quite right. Kimble feels a deep and personal connection with his work.
We asked him if he received many visitors to his memorial. He said that he did. A few remarked that they were not even aware that it was there. Or that they had seen it and just never bothered to come look at it. I thought about myself in that instance. Kimble said that many people are too afraid to come and look at it. I felt a burning feeling of guilt as he said this. Maybe that is why I never bothered to come see it. Kimble said that folks see his black panther shirt and they think he means trouble. Perhaps they also just want to forget that horrible things like slavery were once a reality right here.
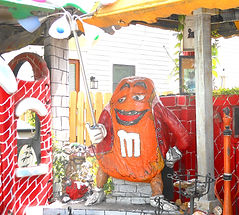
My favorite part of the monument was the section that Kimble had created with the neighborhood children in mind. He voiced concerns about the children in the area observing the wrong behavior going on around them. He said that childhood is precious and that they should hang on to their innocence as long as they can. The back section had a built-in Little Tykes playground complete with a slide. There was also Teddy Ruxpin, a giant M&M, and an adorable penguin and a puppy dog with a bone watching over them.


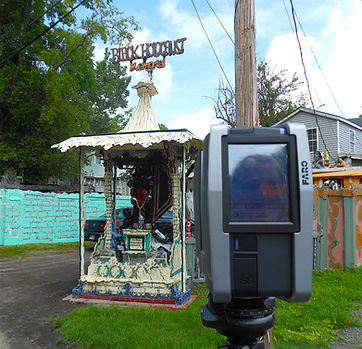
The Scanning
For the scanning we broke out the Faro Focus Laser Scanner again. This is the same scanner that we utilized on Chocolate Plantation. The process for using it is quite simple. The steps are listed out below.
Step One: Create new project (name your project)
Step Two: Preview scan
Step Three: Parameters
Step Four: Profile
Step Five: Preview scan
Step Six: Home
Step Seven: Start scan
Step Eight: Parameters
Step Nine: 20 millimeters outdoor
Step Ten: Home
Step Eleven: Horizontal vertical
Step Twelve: Adjust the scan
Step Thirteen: Home
Step Fourteen: Start scan
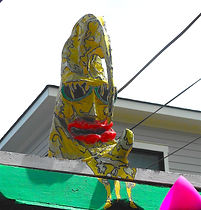
Penguin (Secrest,18).
M&M (Secrest,18)
Puppy (Secrest,18)
Faro Focus Scanner at Memorial (Secrest,18)
Black Panther (Secrest,18)
Angel (Secrest,18)


Kiley Secrest, Emerson Pavor, Professor Keller (Evans,18)
Kiley Secrest Scanning (Evans,18)
Class Gathered Around Scanner (Evans,18)
After the scan data was collected, it was time to return to the computer lab to process it. This is the exact same procedure that we used for the Chocolate Plantation. All of the raw scan data was uploaded into Scene from the Faro Focus scanner via the memory card. Then it needs to be exported into JRC 3D Re-constructor. Begin by processing each scan individually. Also, remove any duplicate scans which contain the same information. Right click on each scan and select the "process" option. Remember to process these scans in color. You will know they are processed because a little red "p" will appear to the left of the scan name.
When all of the scans have been processed, the scan data needs to be registered. Again, manual registration is necessary because automatic registration rarely works. This process involves selecting two layers at a time. To access this you go to "line-up" and select "manual pre-registration" from the drop down menu; be sure that you have two consecutive scans selected first. A split screen will appear with your two selected scans in the menu below. Always click on the lower number scan first and select "reference grid" and the higher numbered scan as "moving grid." Select at least three corresponding reference points on both scans. Remember to always select each point on the reference side first, then select the corresponding point on the moving side. After the points are selected, the next step is to press "compute." A box will pop up explaining what the mean registration error is. You want it to be less than 0.005000. The more zeros in front and the lower the number, the better.

JRC Reconstructor stitching process with two scans.
After all of the scans have been stitched together, be sure to load the model and make sure that it looks like the layers came together crisply. Also, remember to SAVE your work as you go! Be sure to clean your scans at this time; meaning crop out any unwanted obtrusions. You will go through the scans in groups of two again, only this time you will be selecting "cloud to cloud registration." Now you select all of the scans, right click, and select "create point cloud cluster." When the box appears, make sure that "Reflectance," "Color," "Confidence," & "Inclination" are all selected. After that you will have created and named a new point cloud. The next step is to select your new point cloud, right click, and select "create 3-D mesh." Another box will appear and you will want to make sure that you have selected "average," "smooth," & "only small." At this point a new view will be created by going to "cross sections," then "create new plane." You will select X,Y,& Z coordinates on your model for the purpose of creating a new default view. You select each point in order on each corner depending on which angle you want to be viewed from the front. To select a point, hover over the corner and click on it while hitting the "alt" key. Then in this window you will select "make plane horizontal." A new plane icon will appear and you will then right click on it and select "Create New UCS View From Plane." After that go to the "UCS Camera Angles" and set this view as your default.
The final step is to export your model. If it is for 3-D printing like our Laurel Grove Cemetery project, then it would be exported as an Obj file. For the purposes of this project it was going to be uploaded onto Sketchfab. Unfortunately, due to licensing restraints, this was not a possibility. Below is a gallery of screenshots taken in JRC Reconstructor which show the model after all of the previous steps are complete and it is ready to export.
 |  |  |
|---|---|---|
 |  |  |
Gallery showing screenshots of completed Black Holocaust Memorial model.
bottom of page